Imagine someone sends you a load of Microsoft Word files chock-full of confidential information. It’s your job to go through the documents and remove all sensitive data by redacting them before they’re sent off to a third party. Of course, this request also comes with a pressing deadline. Here’s the real problem, though: You’re up against the clock, your options are limited, and Word has zero dedicated redaction features. What now?
The reality is that no one wants to have to redact in Word. There are many tools and platforms that make document security easier, faster, and more secure. However, you don’t always have a choice. Fortunately, there are three workarounds you can use to securely remove information from Word files. These are still far from ideal, but they’ll get the job done. Keep reading to find out what methods to use and the best practices to keep in mind when redacting Word documents.
Here’s how to redact Word documents – 3 top methods
Below, we break down how to redact in Word in ways that are secure and irreversible.
Method #1: Find and replace
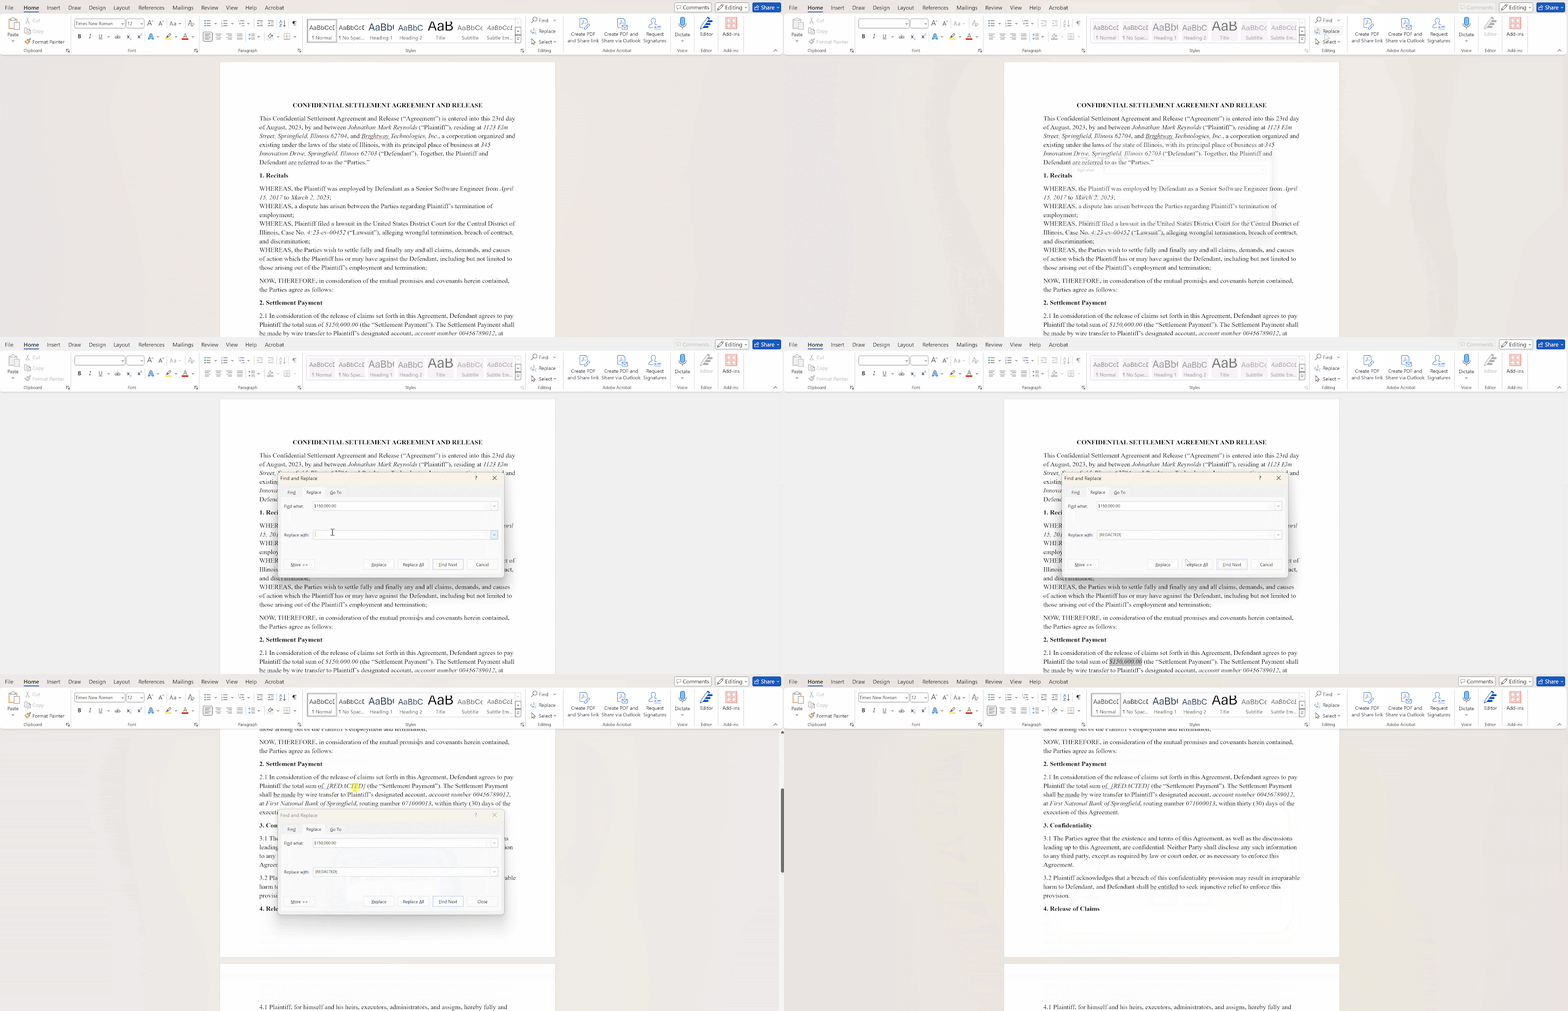
For this first method, open your Word document and go to Home → Replace. This will pull up a dialogue box called “Find and Replace.” Here, you can search for the confidential information you need to remove. Then, in the other box, you can type your redaction marks, such as asterisks, or the term [REDACTED]. Click “Find Next” and ensure the correct information is highlighted. Then, click “Replace” to replace the text with your redaction marking like this:

Screenshots captured at time of publishing (MS Word, Version 2408) and is subject to change.
Follow this process for every piece of confidential text information, ensuring that all of it is replaced.
Then, navigate to File → Export → Create Adobe PDF.

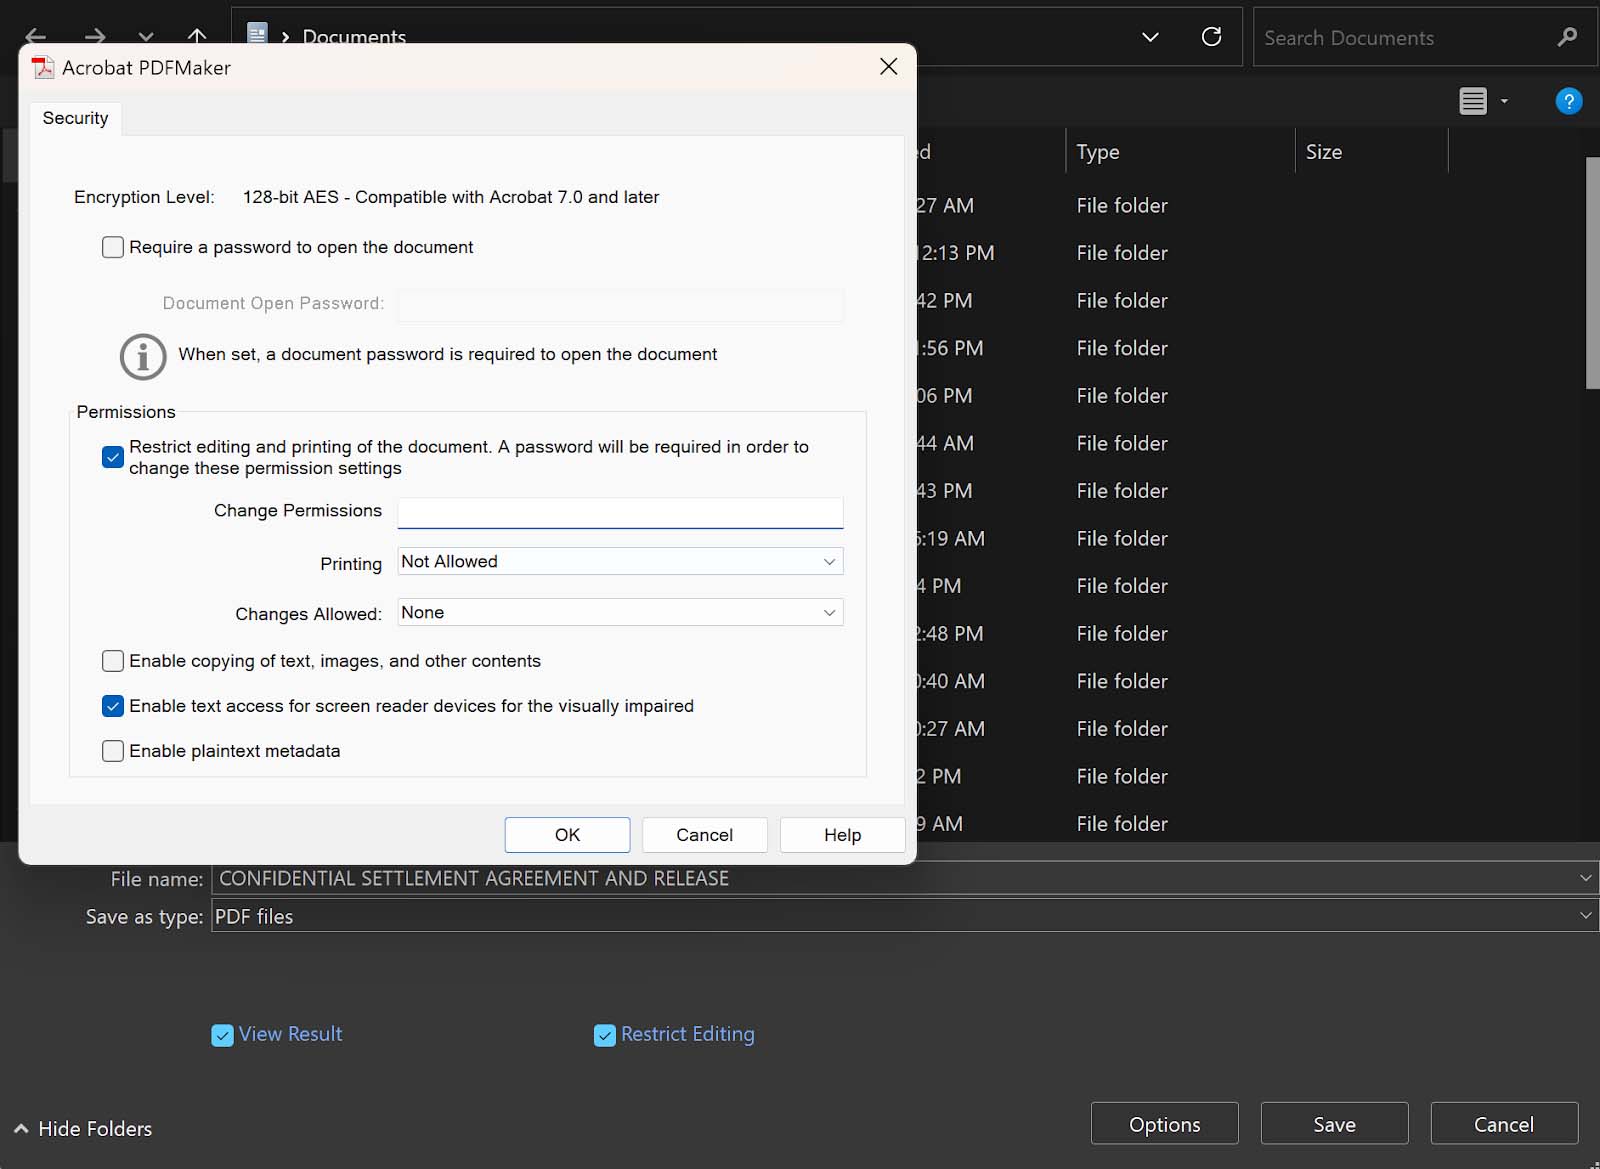
This will open a pop-up window allowing you to choose your file location when saving your redacted document. In this pop-up window, select “Restrict editing.” Then, you’ll have the option to set a password and adjust permissions. Leave “Enable plaintext metadata” unchecked to prevent hidden data from remaining accessible within the file.

Click OK and then Save to store the file on your Desktop. Then, upload the redacted PDF to your cloud storage and share the link with any required third parties.
This method does ensure that all information is removed securely. However, it is extremely time-consuming as it requires manually typing in each and every piece of confidential information you want to redact. With so many different types of personal information alone (from names to email addresses, phone numbers, and social security numbers), this is far from optimal. Still, if you need to redact a document in Word, this process will at least prevent private information from being inadvertently leaked.
Method #2: Read, delete, type
The second method you could use is even more hands on, but is more suitable for identifying contextual information, images, and other types of confidential data that are more difficult to detect using the first method.
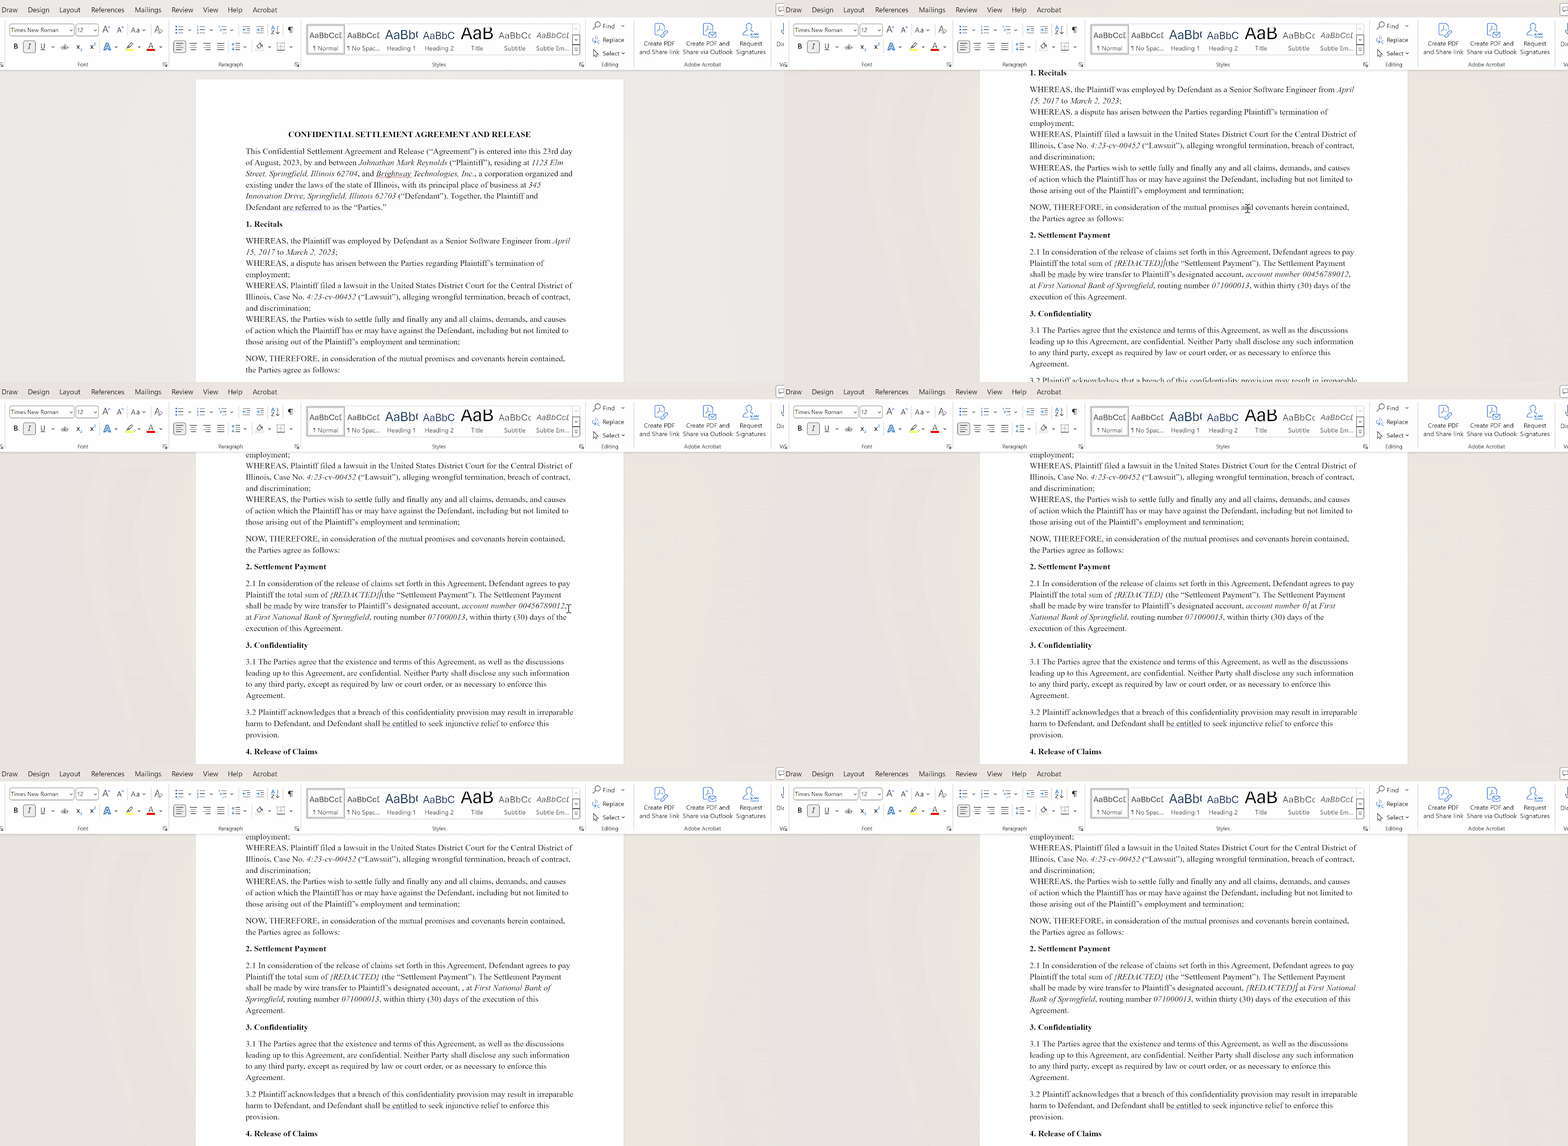
With this, you open your document in Word and scroll through it, reading it line-by-line and searching for sensitive terms. When you come upon a specific word, data point, or image, you then delete it and type something in like [REDACTED] to show that a redaction has occurred.

To ensure these changes are permanent, follow the same steps above to save the document as a PDF and restrict edits to ensure document security.
Method #3: Black box redaction
One of the traditional ways to mark a document for redaction is to use black boxes. If you want to know how to black out text in Word, keep reading.
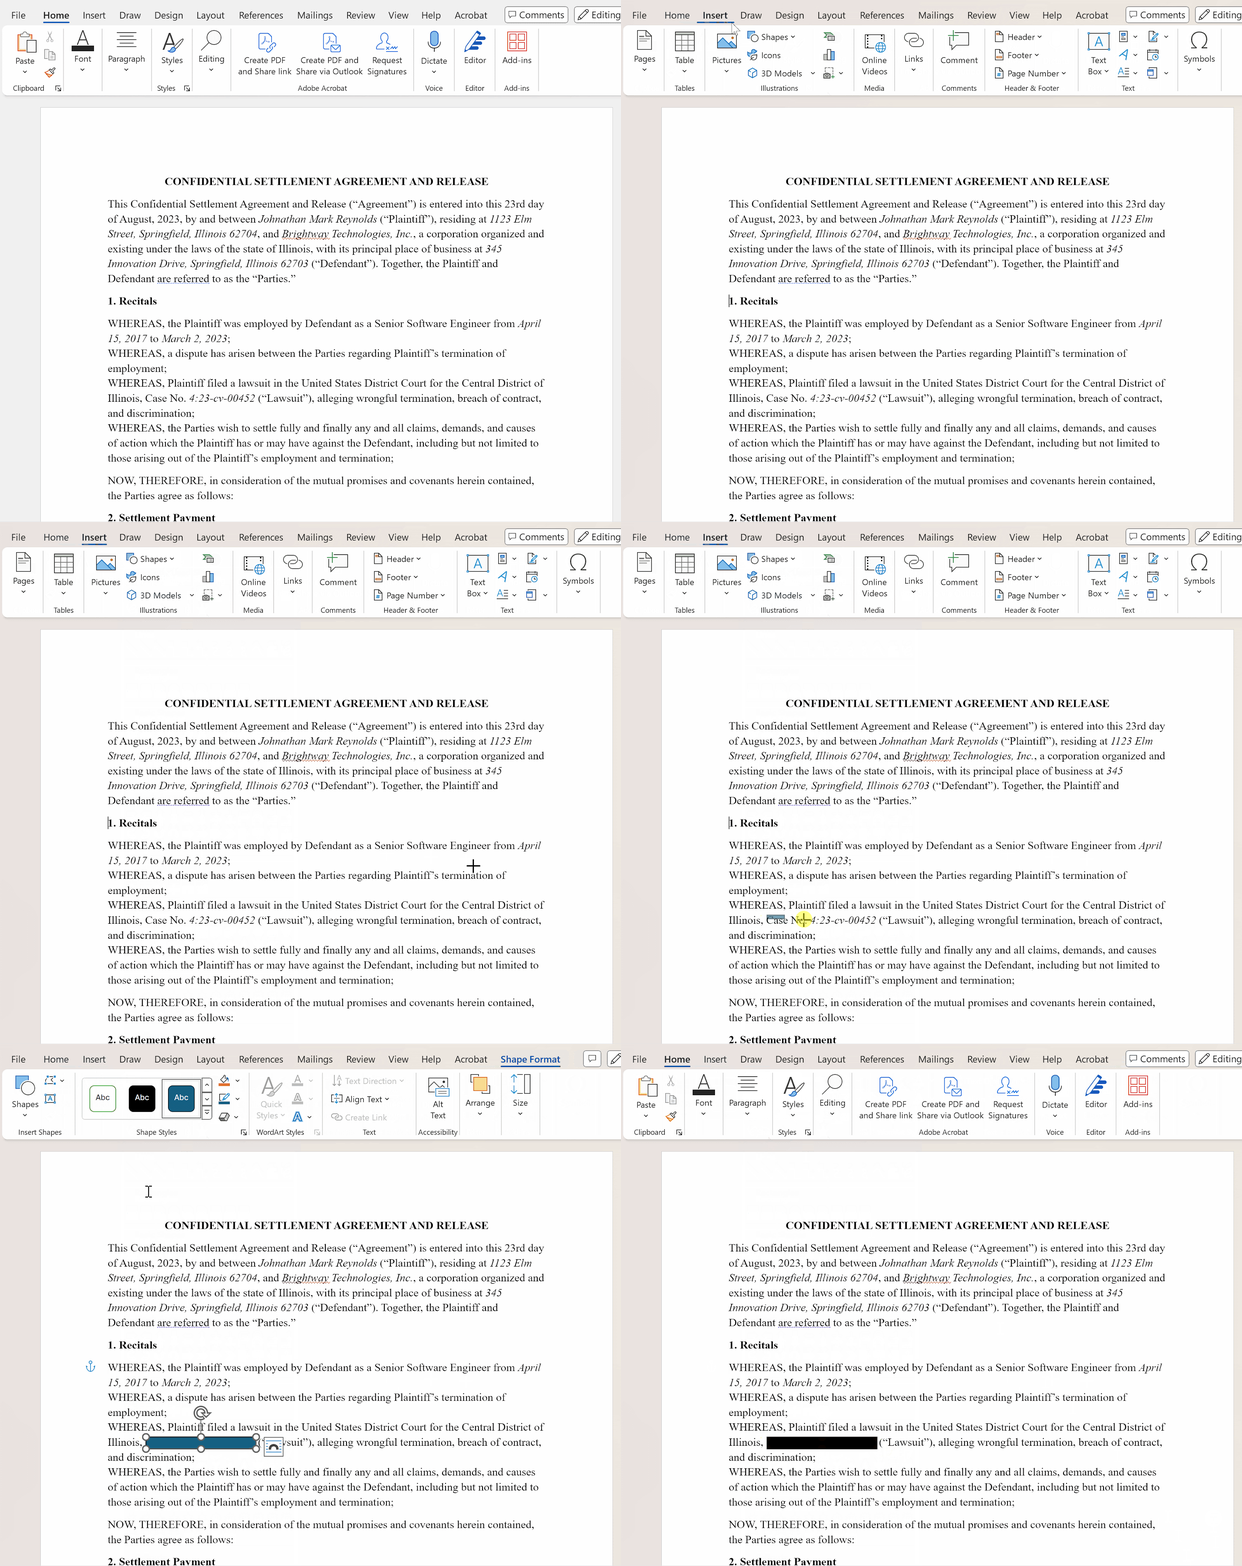
Open your document and then navigate to Insert → Shapes → Rectangle.
Then, draw a rectangle over every piece of confidential data within your document. Once more, you’ll need to manually read and scroll through the file, identifying sensitive terms and marking them. To make the box black, select the shape and choose a black theme from the Shape Styles menu.

It’s important to note that this method does not actually remove the data underneath the markings; it just covers them. Don’t forget to lock the document. As with the previous methods, export the file to Adobe PDF and restrict edits to prevent anyone from easily removing these black boxes later and seeing the text underneath.
And this is how NOT to redact Word documents
One of the methods for locking down a document that you might come across on the internet involves converting a Word file into an image file. If you’re wondering if this is a valid method, it’s not. Here’s why:
Changing a Word document into an image prevents edits or changes, right? Wrong. Free optical character recognition (OCR) software is highly advanced and can easily scan text within images, extracting and digitizing that information. Instead, choose one of the methods above or use an AI-powered redaction tool like Redactable.
Additionally, it’s worth mentioning that highlighting, changing the color of the font, or any other basic edits do not qualify as redaction. They are simply data masking methods that allow the text underneath to be easily revealed simply by highlighting it.

Some things to keep in mind when redacting in Word:
Follow consistent redaction policies
If you’re wondering, “how do you redact in Word without leaving information exposed?”, policies are a big part of the answer. Set up clear and explicit guidelines for what types of information should be redacted across all documents. In most industries, this means identifying and removing data like:
- Personally Identifiable Information (PII): Names, addresses, social security numbers, phone numbers
- Financial information: Account numbers, credit card numbers, dollar amounts, loan information
- Protected data under attorney-client privilege: Any information involving discussions between an attorney and a client must be redacted to ensure attorney-client privilege.
- Health information: Medical records, insurance information, medical identifiers
- Geolocation data: Information that could reveal a person’s or company’s geographical location, such as IP addresses or property information
Ensure your redactions are complete
Whether you’re using drawn black boxes or hand-typed marks, it’s important to ensure your redactions are complete. Not only must you identify every instance of a sensitive term anywhere in your document, but each term must also be completely obscured. Be careful not to leave partial address information exposed because your black box wasn’t large enough.
Take your time
There’s no way around it, redacting in Word is a time-consuming task. However, it’s also a manual process, which means it’s vulnerable to the risk of human error. Don’t exacerbate this threat by moving too fast. Take your time and double-check that all sensitive information has been properly removed. Also, be careful not to delete or move your redaction markings as you move through and export the file.
Keep a redaction record
Redaction is often a key part of complying with various rules and regulations. To easily demonstrate your compliance when audit season comes around, it’s a good idea to keep a record of all redactions. This record should identify who redacted the document and when. Consider labeling redactions as well so that auditors also know the reasoning behind each redaction.
Redactable is the ideal choice for redacting documents

Can you redact in Word? Yes. Should you? Not if you can help it.
Instead, it makes far more sense to bypass the slow, tedious processes of manual Word redaction and choose the industry-leading automatic redaction solution – Redactable.
To use Redactable for Word documents, just export your files to the PDF format and then batch-upload them all to our cloud-based solution. Easily organize files into projects and redact hundreds of pages in just a few minutes with the power of artificial intelligence.
Redactable offers a range of features and benefits to enhance the document redaction process, including:
- Intuitive interface: Redactable’s user-friendly design minimizes training needs and allows you to start redacting in just a few minutes.
- High-volume processing and scalable cloud infrastructure: Redactable effortlessly handles large document volumes and can scale resources based on project needs.
- Audit trail and reporting: Comprehensive logs and reports are generated for each bulk redaction project, facilitating compliance and accountability.
- Secure document handling: Redactable ensures end-to-end encryption and secure storage of documents throughout the redaction process.
- Collaborative workflow features: Team-based review and approval processes support bulk redaction projects.
- Automated redaction certificates: Court admissible documentation is generated for each redacted document, streamlining compliance efforts.
Contact our sales team to get started, or discover for yourself how a dedicated redaction tool can save you time and money by trying Redactable for FREE today!


